Looking back in this term ,some things went better than others. When the art portfolio 1 was started I learnt how to make canvas, that I had to repainted three times to get appropriate results. Comparing art portfolio one to art portfolio two I started with practice and knowledge how to make canvas, in what areas I’m better and where I have to work to improve my skill, that’s mean I made progress by using acrylics, however in watercolours I still have to spend more time to get appropriate paintings. This term I focused more on painting drawing landscapes in impressionist style than people in expressionist in last. Going through this process the small canvas boards painting with 3D sand mixed with paint on it went really well. Bigger version of it went ok and I learnt painting structure from it that’s mean what is need to be first painted as background moving on to the background buildings and at the end the details. Everything was usefull for me, because for example last weekend I spent with my partner and kids and I teach they how to make sculptures, I made my own for my project ,but when I finished I teach they how to make small ones and day after, they painted it. So this term… this year show me the road how to spend time free time, to teach others, to get natural dopamine after and during process I fell positive emotions which helped me and influence to people around me. I also improve my language skill, it still need to be improved but I made massive progress. This is my road to become the artist to create to tech.
Fantastico Artistico
Monday, 2 June 2025
Sunday, 1 June 2025
Project Outcomes for Portfolio
Below I leaving my final outcomes :
Köslin around 1930
Koszalin 1945
Koszalin around 1960
Unnamed soldier
A soldier returning to his mother
Saturday, 31 May 2025
Third Tutorial
During third tutorial my Tutor suggest me whats going well and what I have to improve for instance for 2D outcomes he suggest to repaint some areas, galazing some that means focus on details. For 3D cover the wire by clay and paint a surface of plinth.
Tuesday, 27 May 2025
Website Update process
Today in a class time I created new project galley "From Köslin to Koszalin".
I also changed term to to term three in about page
After that when Im back to home I spend some time to write an introduction for my project.
Moving on I changed the background image to new one related to my actually project
Next I changed the image in portfolio section to my own from my project and as previous one I set saturation to black and white
Inside "project" category I also add new images related to sculpture and painting
Inside sculpture I added gallery of my sculptures, the first one "Unnamed soldier"
and the second one "A soldier returning to his mother"
Moving on to "Paintings" here I added photos of paintings and titles.
At the end I check everything in smartphone view and in PC view as well. When Im sure everythink is ok I saved and published my website.
Monday, 26 May 2025
Artist Research: Camille Pissarro
Today I'm going to look at Camille Pissarro artworks and how he painted people. Pisarro was a Danish-French painter (1830-1903) he was one of famous painters of impressionism. What is interesting is fact that Pisarroo met Claude Monet during Suisse Painting Academy in 1859 which already I have done artist research with. (impressionistarts.com, n.d.)
First Pissarro painting I'm going to look at is Boulevard Montmartre in springtime and how he painted people n the street.
Pissarro C, Boulevard Montmartre in springtime 1897
I took this artwork because I'm learning how to paint human figures in landscapes. What is different between my paintings and Pisarro is way how we painted people, I using straight lines which is basic form of painting ,Pissarro using curves lines and shapes, he focused on light and atmosphere . He doesnt paint details but made it by little brushstrokes - this technique gave life to people and the street. What I learn is that I dont have to draw every single leg, hand etc. I can place many people in my artwork just by painting shapes and colours. In the 1890s, when Pissarro finally become famous and get money, he started painting Paris from hotel windows ,the same streets at different times of day showing how the city changes. (Sidelnikovbut, n.d.)
Second painting im going to look at is Rue Saint-Honoré in the Afternoon. Effect of Rain. it is the same city vibe as before but in the rain. The colours are more grey, people again are small and when I zoom in too look at technique of painting people I saw small brushstokes, in few tones of colour. As state Museo Nacional Thyssen-Bornemisza (n.d.) Pissarro painted this painting from a hotel window in central Paris in 1897 when he was sick and old he moved from the country to the city and started painting city streets in rain, sun and in different times of day.
After that I started practising painting people as Pissarro
Reference:
impressionistarts.com. (n.d.). Camille Pissarro | ImpressionistArts. [online] Available at: https://impressionistarts.com/camille-pissarro-biography [Accessed 26 May 2025].
Sidelnikovbut, A. (n.d.). Montmartre Boulevard. Spring morning. [online] Arthive. Available at: https://arthive.com/camillepissarro/works/376955~Montmartre_Boulevard_Spring_morning [Accessed 26 May 2025].
Museo Nacional Thyssen-Bornemisza. (n.d.). Rue Saint-Honoré in the Afternoon. Effect of Rain. [online] Available at: https://www.museothyssen.org/en/collection/artists/pissarro-camille/rue-saint-honore-afternoon-effect-rain [Accessed 26 May 2025].
Thursday, 22 May 2025
Process post 3 3D
Here I went to wood work to asked Chris about base from MDF for my sculptures. Chris cut it for me immediately, I also asked about "PLINTH" but he told me to back around 3PM... so I back to art factory with my two pieces of MDF 20cm x 20cm and 30cm x 20cm.
After that I took the wires, tools, base for sculptures, clay etc. to my partner house and I worked on it.
I used same method as before term, that’s mean took the aluminum wire then twisted it to make a shape and then wrapped copper wired around aluminum one.
After that I used a glue to stick it to the base and then I left it for the night to dry it off.
Friday I began from creating the first shapes of figures. For this task I used air drying clay and modeling tools.
Here I leaving a photo from different perspective.
In half way through I realize that I made too long torso, but I continued making sculpture and tried to fix it.
After that I started adding the structure to my sculptures.
When I finished I left it to dry it off.
After that I moved on to the next one, I used same method and I made a same miss take that's mean the torso of the sculpture was too long but I continued making it. By the way I forget to take the photos of process. At the end I added the wire as a base for the flag. Flag is still unfinished.
To better understand the topic I watched the video depicting destroyed Warsaw after WWII
This it showed me what the buildings, the atmosphere looked like at that time, which I used for my project
Next day I covered the wire by clay...
After I bring the sculptures to Art Factory and from piece of paper I created the flag which I painted before.
Then I painted the plinth
Reference
Logan Rainwood (2021) Destruction of Warsaw by the Germans – World War II – Warsaw Uprising, Full HD Colour Film. [online video] Available at: https://www.youtube.com/watch?v=hzt_36dnbx8 [Accessed 2 Jun. 2025].
Wednesday, 21 May 2025
Process post 3 2D
Firstly I started from doing quick sketch of my project.
Koszalin Old Town Market Square, 1945 – photo from the private collection of Kacper Pencarski.
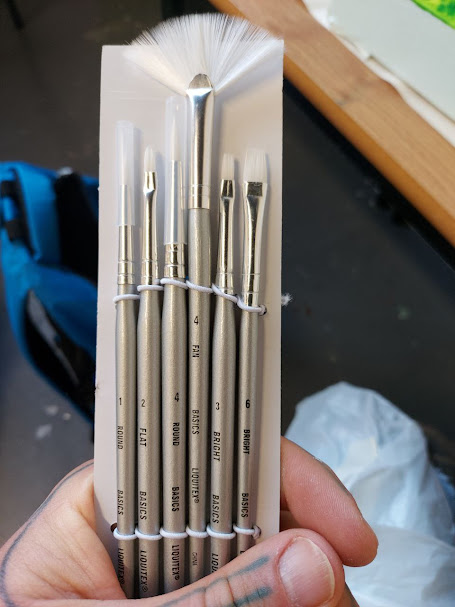
Day after finally I bought a brush set and than I used it straight away.
I used “ROUND” brush to paint a cars on my third painting and it was much better then previous one. I see a difference and feeling when I using it.
Art Portfolio 2 - Final Reflection
Looking back in this term ,some things went better than others. When the art portfolio 1 was started I learnt how to make canvas, that I ha...
-
Here is my Major Project Working Plan. *I will update this plan in week 5 and week 7. Then I will add new information to this posts includ...
-
Looking back in this term ,some things went better than others. When the art portfolio 1 was started I learnt how to make canvas, that I ha...
-
In this week I improved my quick experimental sketch I added to id details and spent more time on it. From beginning I started to repair pr...
.jpg)
.jpg)
.jpg)


.jpg)


.jpg)
.jpg)

.jpg)
.jpg)

.jpg)


.jpg)
.jpg)
.jpg)

.jpg)
.jpg)


.jpg)

.jpg)
.jpg)
.jpg)
.jpg)
.jpg)
.jpg)

.jpg)
.jpg)
.jpg)
.jpg)


