Thursday, 27 February 2025

Process post: 3D material testing

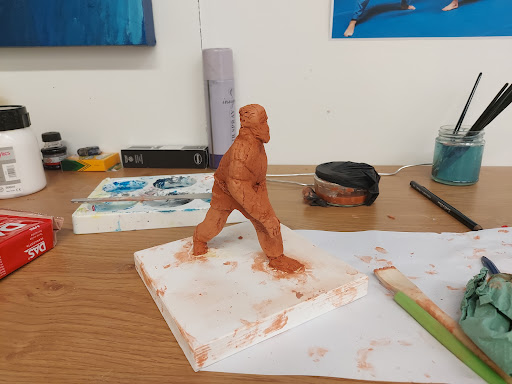
This time I testing materials… So I started from adding clay on skeleton sculpture.


After I created basic shape, I used a part of clay and made a Gi/Kimono/Clothes for my sculpture. Then I moved on to create a belt so I took a part of clay ,rolled it and wrapped around my sculpture. To create a hair, hands etc I used a part of clay and after manipulation I added it to my sculpture. 


Reflection: It was good decision to do a test before  I started my major sculpture. I realise that I have to create first a primary model and various parts as belt, kimono, hands, foots etc I have to create using an extra part of material.

Process post: Re-Painting Outcomes!

After my tutor suggestion I repaint the backgrounds of my three outcomes… This is how it’s looks before…


In the first painting I used two colours as a bacground then I painted shadows, highlights nad at the end white details…


Then I moved on to second one, here I used a red colour as a bacground and as before I added shadows then highlights and white/black details at the end.


At the end of the day I moved to third piece of my work… here i decided to used a blue colour as a background.


Reflection: In first moment when I realise that I have paint it again … I felt like I have to move stones from one site to the other and my tutor bring extra stones and give me more to do… In first moment I calculated everything and sorted in my head how to manage time correctly… But one of my motto is”no pain, no gain” and to make progress I have to paint, repaint and then paint again and repaint…. It’s never ending story… Allways I can come back to my paintings and add some changes. I’m really appreciate my tutor time and his suggestions. My painting now looks better but I know… I can allways back and add something.

Monday, 24 February 2025

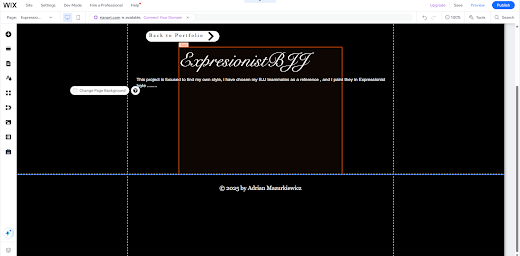
Website Update: Art Portfolio One

 Today we are going to updating the website, I will add all my updates here. I will also be adding a new portfolio page for my project in Art Portfolio One.

I began by updating the copyright from 2024 to 2025. I did this by clicking on copyright text and just adjusting the number. I then saved and republished


I then checked all my social links were working and did not need updating.

I then checked my Home, Portfolio, About and contact page. I was happy with these and they all work well and I have buttons to navigate back home and back to portfolio, I also checked these in the mobile view and everything is working.


I the needed to add a new image to front portfolio page. To do this on Wix, I clicked on the add button in the tools menu. I then clicked on upload image. Once this was uploaded, I clicked on "add to page" and then I posited this carefully using gridlines and then transform control.


I then added a new page for my project for this term. Therefore I clicked "pages and menu" and then clicked on "new page". I then clicked into the box and changed the name of my project title. I made sure the box was ok for the portfolio page. I then clicked on the tree dots at the end of the box and clicked "subpage" in the dropdown box. Next I went back to my main portfolio page. I went to the "add" button in the tools menu and then to "button", I then customized the button o match to the others on the page and used the same font. Lastly I clicked on button using the link icon, a dialog box opens and I chose the page (my new page) that I wanted it to link to.


I then saved all my changed, I republished. Then I checked that the button worked live.


I then went to my blank page that I just created and I am going to add a title, introduction and back to portfolio button and I will add a box.


I began by adding the title I did this by clicking on the "add" button and the text and choosing "Heading 1" I then ensured the text was in the same font I changed the size to fit the page. I then aligned the text to the center using the gridlines.


I then repeated this process above and just added a "paragraph" to the page - this will be where I add the introduction to my project.


The last things were to check was back the portfolio button, I checked it and works well. After I clicked on the "add" button tools mendu and I chose "gallery" and to add I just drag and drop.


I then saved all my changes and republished. I then previewed and check everything work. I was happy with these changes - this is now ready for final work.


Friday, 21 February 2025

3rd final outcome

 This final outcome I started from planning that's mean I asked my colleague Violets how to be a pro in painting... She give me advice to paint background and then paint a area of colours then move on to dark shadows and at the end highlight. So I started by drawing quick sketch as a warm up...


Then I moved on to planing tones of my painting... I have chosen green and purple/violet tone... So I began from painted a green background...


After that I painted area where are my models going to be and then I realise that my painting is too small so I fix it adding light pink around "shade"


Next I moved to draw the shades , highlights and thinks like triple leg and lines emphasise the movement.


Below I leaving my final outcome.


*After I red comment I repaint it but when I look again on Robert Riggs artwork ,something clicked in my head and I started understanding my project goals. The forth outcome I painted in different style tried to show emotions.


Thursday, 20 February 2025

Process post + 2nd final outcome

Today I added third layer of primer then I used sand paper and then I painted it fourth time. It’s looks how its looks. I’m will put another layer of primer tomorrow… I added a lot of water to jar with small amount of primer maybe that is the reason why its not perfect fully covered. 


After that I moved on to quick sketch as a warm up exercise…


Then I did artist research and painting as inspiration for my painting… I opened google and found painting on canvas painted by Serena Singh titled The Fighter. Below I leaving her work… by the way I didn’t know which colours would be fit together to as a inspiration I looked at Singh art work…


Singh, The Fighter (2019)

Next I experiment with yellow which tone I want as a background and the prime tone was perfectly for my painting.


Then I mixed red and yellow to get orange tone to draw sketch using small brush, in a half way through I realise that my brush isn’t perfect condition because I used it to clean plastic form from paint and I used painting side so probably I will buy new one…


When I finished painting the models I focused on a background so I mixed again colours to get correct tone.


Here is my result, I touched the canvas by glove so its looks dirty in some area ,but I will repaint it in that place and when I finish all paintings I would like to paint the edges of my canvas. 


*After I red the comment from my tutor I remained what I have to do and what its my goal/purpose in my project and I decided to repaint my outcomes.


Wednesday, 19 February 2025

Process post + 1st final outcome

 Today I went to the wood work and asked Chris for a base for my sculptures , he imidietly asked me about measurements ,material and started cut. Measurement of base is 45cm by 20 cm and its made from MDF. I have two options but MDF is more smoothly to paint on it. When I have got my base im straight back to art factory…


After conversation with Sam I started adding the first layer of primer…


After that I leaved it to dry off and then I used a sand paper on it to make the surface smooth and prepared for next layer…


When I have done two layers of primer I leaved it to dry and moved on to do quick sketch of my near future painting…


After sketch I took the canvas and started painting background of my artwork…


Next step was to paint models using small brush, then moved on to bigger start painting…


Presentation feedback

Today I presenting my major project plan ,that’s mean I presented the aims, theme , planning, process of creating the work, reflections about my project etc.


Below I leaving the link to the feedback of my presentation: https://docs.google.com/document/d/17O-_KtKA22mJnqImA0EmV4nYTgEYR8giBNWR9FW1MIU/edit?usp=share_link


Reflection: The presentation went well ,I explained and discussed about my goals ,process ,planning in my Brazilian Jiu-Jitsu in expressionist style major project.

*The feedback helped me and remained me what I going to do… I have to focus and show  “movement” in expressionist style.


Tuesday, 18 February 2025

Process post of project development 3D

Today I started creating wire skeleton for sculpture. For this task I used a 3mm aluminium wire which I bought on ebay. So I took a wire and as Sam showed me and explain how to do it correctly ,i began creating my art.


First step was to plan the size of a sculpture and then draw human body proportion measure and cut 60cm of wire and then bend it in half ,next to twist in the middle where it will be the torso and cut where it was bent for arms.


When I have done this task I moved on to wrap around aluminium wire the copper wire. This makes the skeleton stronger.


After that I started manipulating my skeleton to correct pose.


*To create a shape of figures I will use an air drying clay. It’s easy to manipulate material ,and used it before so in my case it’s best option. I could use too mudrok but I used it just one time and I don’t feel it. After consideration AirDryingClay is material which I going to use.


Process post of project development 2D

 In this week I improved my quick experimental sketch I added to id details and spent more time on it. From beginning I started to repair proportions and then I redraw eyes ,added shading ,white colour etc.


Then I moved on to second experimental sketch and as before I tried to spent on it more time and make it better… I tried to repair proportions ,especially hands was too small and add more dark tone to make it more smooth. At the end I focused on the background. 


After that I started to experiments with acrylic colours… So I started from painting the Pedro face ,but I realise its something going wrong… I asked Sam how I should start and he suggest me to make a background as a first and then move to paint a model but more in expressionist style and quicker. So after Pedro’s face I paint the blue background and then I painted a model, after that I repeated this process. 


Reflections? Next time I will make the paintings more expressionist to emphasise the movement and action. 

Next day I spend some time on continuous drawing ,it was quick approximate 2-3 minutes per sketch ,results I leaving below:


The first one like the others depict sparring between Pedro and Paul my team mates durning Brazilian Jiu-Jitsu training.


I really enjoy the process and I was surprised how important is warmup before drawing ,maybe its not perfect, but after few sketches proportions was much easier to catch.


Next time before drawing I will use this continous line or just quick sketch to warm up.


*Reflection: This process was very useful in my Major Project. After that every time before painting i doing quick sketch in my sketchbook by pencils. Another interesting lesson was that i could always back to my drawing or painting and repaint/redraw it.


Monday, 17 February 2025

2D and 3D Outcome: Project Plan Update

Week 7 

In this week I will focus on:

3D outcome:

*making base

*making wire skeleton

*making sculpture 


2D outcome:

*colour experiments / sketches 

*look at the artist and colour expressionist style artworks.

*use a sand paper on canvas to prepare the surface for painting.

*draw pencil sketch on canvas and paint it.


Blog: add two post of creation and process 


Week 8

In this week I will:

3D: paint the sculptures

2D: create 2 paintings


Week 9

2D: create painting 

Create portfolio and add it to website. 


*Here im leaving my Major Project Plan.

3D Outcomes: Planing

 For my major project I will create two 3D sculptures of  my teammates durning Brazilian Jiu-Jitsu sparring. For this task I will use a wire to create a skeleton for my sculpture and air drying clay as main layer. As a base I will use a piece of wood or something similar to this. 

When I finish sculptures I will leave it to dry off and after I will use acrylic paint.

I leaving my preparation sketch/plan for sculptures drawn by pencils and then ink pens. After some consideration I changed an idea to create one base for it instead two separates.


Art Portfolio 2 - Final Reflection

 Looking back in this term ,some things went better than others. When the art portfolio 1 was started I learnt how to make canvas, that I ha...